Cone Sushi: A Delicious Twist on Traditional Sushi!
Table of Contents
What is Cone Sushi?
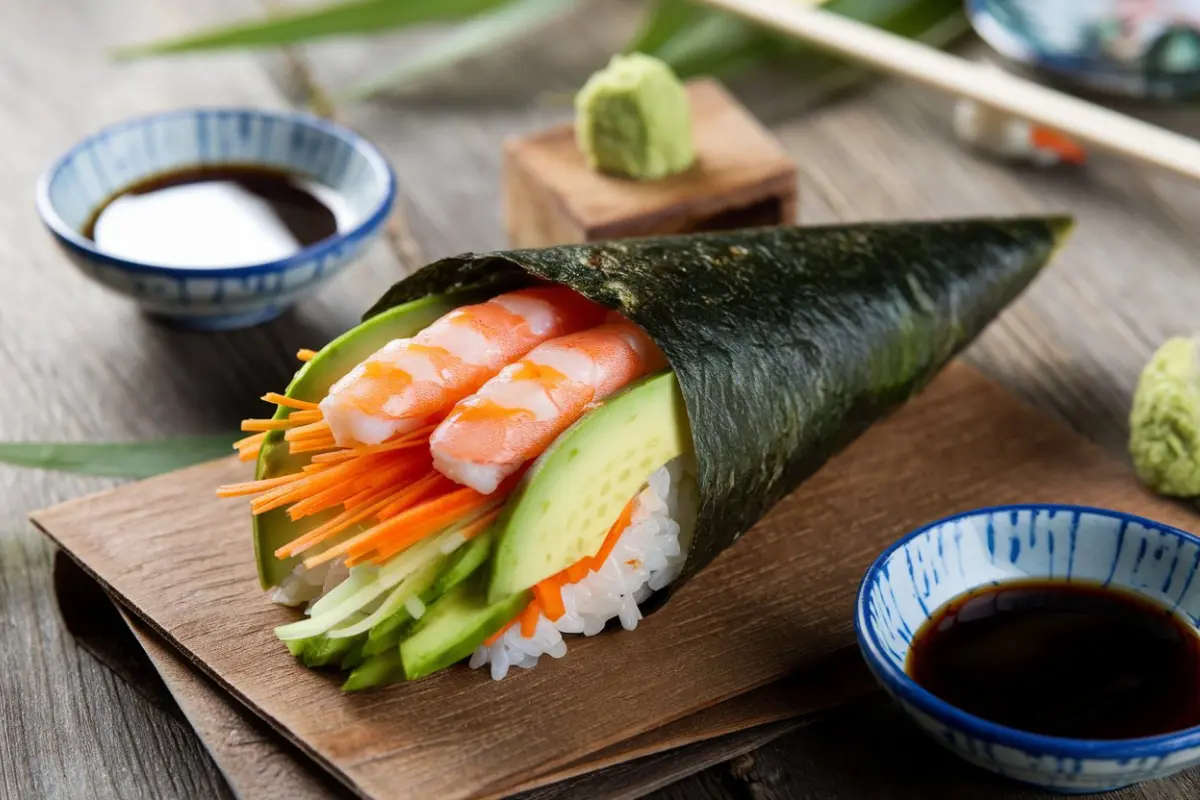
Cone sushi is a type of hand-rolled sushi that allows you to enjoy a variety of flavors and textures in a unique, portable format. Unlike traditional sushi rolls that are tightly packed and sliced into bite-sized pieces, cone sushi is served in a cone shape, making it easy to hold and eat. The fillings are visible and can be as colorful and creative as you desire.
This dish not only showcases the beauty of fresh ingredients but also provides a fun, interactive dining experience. Guests can create their own cones with their favorite fillings, making it perfect for lunches, gatherings, or family meals.
A Brief History of Sushi
Sushi has a rich history that dates back over a thousand years. Sushi has its roots in Southeast Asia, where it was initially developed as a way to preserve fish using fermented rice.Over time, the dish evolved into what we know today, with various styles emerging across Japan and beyond.
The modern sushi we’re familiar with, characterized by vinegared rice and fresh fish, began to take shape in the early 19th century. The first sushi restaurants opened in Tokyo, and the dish quickly gained popularity. As sushi spread globally, many different styles, including cone sushi, were developed, reflecting local tastes and preferences.
Why You’ll Love Cone Sushi
Cone sushi is not only visually appealing but also incredibly versatile. You can use a variety of fillings and toppings, making it suitable for everyone, from seafood lovers to vegetarians. The combination of fresh ingredients wrapped in crunchy seaweed creates a delightful texture and taste that is sure to impress your family and friends.
Ingredients for Cone Sushi
To make sushi cones, gather the following ingredients:
For the Sushi Rice:
- 2 cups sushi rice: This short-grain rice is sticky and perfect for sushi.
- 2 1/2 cups water: Needed for cooking the rice.
- 1/3 cup rice vinegar: Adds flavor and helps season the rice.
- 2 tablespoons sugar: Balances the acidity of the vinegar.
- 1 teaspoon salt: Enhances the flavor of the rice.
For the Fillings:
You can customize your cone sushi with your favorite ingredients. Here are some suggestions:
- 1 cucumber, thinly sliced: Adds a refreshing crunch.
- 1 avocado, sliced: Creamy texture that complements other fillings.
- 4 ounces cooked shrimp, sliced (or substitute with tofu for a vegetarian option).
- 1 carrot, julienned: Adds sweetness and color.
- 1 red bell pepper, thinly sliced: Provides a vibrant look and crispness.
- 1 cup mixed greens: Such as spinach or arugula for extra nutrition.
- Sesame seeds, for garnish: Adds a nutty flavor and crunch.
For Assembly:
- 4 sheets nori (seaweed): Essential for creating the cone shape.
- Soy sauce, for dipping: A classic accompaniment to sushi.
- Wasabi and pickled ginger, optional: For those who enjoy a bit of heat and flavor contrast.
Step-by-Step Instructions for Making Cone Sushi
1. Prepare the Sushi Rice
- Rinse the Sushi Rice: Start by rinsing the sushi rice under cold water until the water runs clear. This eliminates excess starch, which can cause the rice to become sticky.
- Cook the Rice: In a rice cooker or pot, combine the rice and water. Cook according to the rice cooker instructions, or if using a pot, bring to a boil, then cover and simmer on low heat for 20 minutes.
- Season the Rice: While the rice is cooking, mix the rice vinegar, sugar, and salt in a small bowl until dissolved.
- Cool the Rice: Once the rice is cooked, transfer it to a large bowl. Pour the vinegar mixture over the rice and gently fold it in with a spatula or wooden spoon. Allow it to cool to room temperature. You can speed up this process by fanning the rice with a hand fan or a piece of cardboard.
2. Prepare the Fillings
While the rice cools, prepare your fillings. Slice the cucumber, avocado, and bell pepper. Julienne the carrot and slice the shrimp (if using). Arrange all the fillings on a platter for easy assembly.
3. Assemble the Sushi Cones
- Cut the Nori: Take a sheet of nori and cut it in half diagonally. You’ll want to work quickly so the nori doesn’t become too soft.
- Add the Rice: Place a small amount of cooled sushi rice on one half of the nori. Gently press it down to hold it in place, forming a triangle.
- Layer the Fillings: Layer your desired fillings on top of the rice. Feel free to mix and match ingredients based on your preferences!
- Form the Cone: To form the cone, fold the nori around the fillings, creating a cone shape. Use a small piece of rice to seal the edge if needed. Hold the cone upright to prevent the fillings from falling out.
- Repeat: Continue assembling the remaining sushi cones until all ingredients are used.
4. Serve and Enjoy!
Sprinkle the finished cone sushi with sesame seeds and serve with soy sauce, wasabi, and pickled ginger. Enjoy your delicious and fun cone sushi!
Tips for Perfect Cone Sushi
- Keep It Fresh: Prepare the fillings and rice close to the serving time to keep everything fresh and the nori crispy. If you need to prepare in advance, store the ingredients separately and assemble them right before serving.
- Get Creative: Don’t be afraid to experiment with different fillings! Try cooked eel, crab, or even vegetables for a vegan option. You can also add sauces like spicy mayo or eel sauce for added flavor.
- Presentation Matters: Serve your sushi cones on a colorful plate or wooden board for an attractive display. Garnish with additional ingredients like microgreens or edible flowers for a touch of elegance.
- Practice Your Rolling Technique: It may take a few tries to master the cone-rolling technique, but don’t worry! Each attempt will be delicious, even if it’s not perfect.
- Include Dipping Options: Offer a variety of dipping sauces alongside your cone sushi, such as soy sauce, ponzu sauce, or even homemade sesame dressing for added flavor.
Frequently Asked Questions
Can I Make Cone Sushi Ahead of Time?
While cone sushi is best enjoyed fresh, you can prepare the rice and fillings ahead of time. Just assemble them right before serving to maintain the texture of the nori. If you have leftover cones, consume them within a few hours for the best experience.
What Other Fillings Can I Use?
You can use any sushi ingredients you like! Popular options include tuna, salmon, cream cheese, and various vegetables. Some creative combinations include spicy tuna with avocado, or tempura vegetables for a crunch.
Can I Make the Sushi Rice in Advance?
Yes! You can make the sushi rice a day ahead and store it in an airtight container in the refrigerator. Just bring it to room temperature before assembling your cone sushi.
What’s the Best Way to Store Leftover Sushi Cones?
Leftover sushi cones should be stored in the refrigerator in an airtight container. However, the nori will lose its crispiness over time, so it’s best to eat them fresh.
Variations of Cone Sushi
Cone sushi is versatile, allowing you to customize it based on dietary preferences or the season. Here are some fun variations to try:
- Vegetarian Cone Sushi: Fill your cones with a mix of fresh vegetables like bell peppers, carrots, cucumbers, and avocado. You can also add marinated tofu or tempeh for protein.
- Spicy Tuna Cone: Use sushi-grade tuna and mix it with spicy mayo for a kick. Add sliced green onions and cucumber for added texture.
- Tempura Cone Sushi: Use tempura-fried vegetables or shrimp as the filling for a crunchy and flavorful experience.
- Fruit Sushi Cone: For a dessert twist, fill your cones with sliced fruits like mango, strawberries, and kiwi. Drizzle with honey or yogurt for added sweetness.
- Breakfast Sushi Cone: Use scrambled eggs, smoked salmon, and avocado as filling for a protein-packed breakfast option.
Health Benefits of Sushi
Sushi is not only tasty but also provides a number of health advantages:
- Rich in Omega-3 Fatty Acids: Fish, especially fatty fish like salmon and mackerel, are excellent sources of omega-3 fatty acids, which are beneficial for heart health.
- Low in Calories: Cone sushi can be a low-calorie meal option, especially when filled with fresh vegetables and lean proteins.
- High in Nutrients: The ingredients used in sushi, such as seaweed and vegetables, are packed with vitamins and minerals.
- Promotes Healthy Eating: Making your own cone sushi allows you to control the ingredients, encouraging healthier eating habits.
The Perfect Pairings for Cone Sushi
When serving cone sushi, consider offering complementary side dishes and beverages to create a full dining experience. Here are some suggestions:
- Miso Soup: A warm bowl of miso soup pairs perfectly with cone sushi and provides a comforting contrast to the cool, fresh flavors of the cones.
- Edamame: Steamed edamame sprinkled with sea salt makes a great appetizer that’s both healthy and delicious.
- Japanese Pickles (Tsukemono): These tangy and colorful pickles can enhance the meal and provide a nice contrast to the flavors of the cone sushi.
- Green Tea: Serve hot or cold green tea alongside your cone sushi for a refreshing and traditional drink option.
- Sake: For an authentic Japanese experience, consider serving sake. Its smooth taste pairs well with the flavors of sushi.
Conclusion: Enjoy Your Cone Sushi!
Cone sushi is not just a meal; it’s an experience. The interactive nature of making your own sushi cones brings a fun twist to any gathering, and the flexibility in ingredients means there’s something for everyone. Whether you’re hosting a sushi night with friends or enjoying a cozy meal at home, this recipe will surely be a hit!
Don’t hesitate to explore different combinations and get creative with your fillings. With this guide, you’re well-equipped to master the art of cone sushi and impress your loved ones with your culinary skills. Enjoy rolling, filling, and, most importantly, eating your delicious cone sushi!
-
Wide Noodles with Creamy Mushroom Sauce
… Read more
-
How to Make the Best Homemade Tobacco Onions
… Read more


